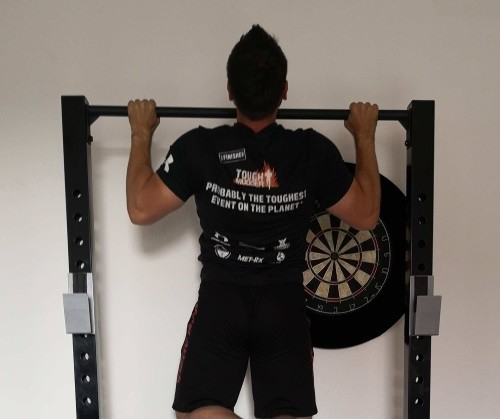
In this article I want to talk to you about pull-ups. The chin-up is the king of back exercises. It is the counterpart to pushups and in my opinion it should appear in one or the other variant in every round strength training plan.
No matter what your goal is, pull-ups are always a useful addition to your training if you integrate them correctly into your training. In order for this to work, I would like to give you some tips in this article for correct execution and different pull-up variants.
In this article you will learn among other things:
One click takes you directly to the section that interests you most. After reading this, you should know the most important things you need to effectively integrate pull-ups into your training.
Why you should have pull-ups in your training plan
The pull-up is an extremely functional basic exercise and finds its way into almost every training plan with me, and there are good reasons for that. Especially when doing strength training with your own body weight, there is simply no better alternative if you want to train your back. Even if you have weights available, you shouldn’t see this exercise as an alternative, but rather as a supplement to exercises like barbell row .
Pulling up your body is certainly one of the most functional movements of all. The muscle activation (especially) in the entire upper body is also very high. Both of these contribute to the fact that the pull-up is probably the best exercise of all if you want to have a strong and healthy back.
Of course, the pull-up isn’t the easiest of all exercises. One or the other will read this and think that he still has to learn pull-ups before he can benefit from the advantages of pull-up training. But that’s not as difficult as many fear. Once you have mastered it, you can use it to enhance any training.
Which is the right pull-up grip?
There is no one right grip in pull-ups. In fact, you can combine different grip variants for your training. This allows you to use different muscles differently and set appropriate priorities.
However, if I were allowed to do just one type of pull-up, I would choose the classic pull-up. This places the greatest emphasis on the latissimus. With this variant, the overall muscle activation is greatest. So it best helps you to build a wide, strong and healthy back and goes best with a compact full body workout . You reach far in the overhand grip (also called instep grip). I want to focus on this variant here and will also give some tips on how to do it in the next but one section.
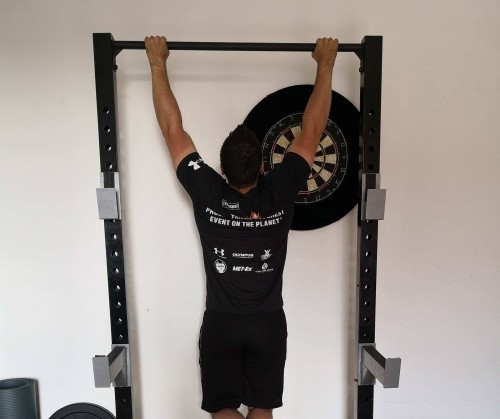
Later in the article, however, I will also take up other handle variants and their advantages.
Which muscle groups are trained during the pull-up
In principle, you train your entire body with pull-up training. Above all, however, the upper body muscles are stressed, with the focus on the back of the upper body. To put it simply, a pull-up works the entire back of the upper body and biceps.
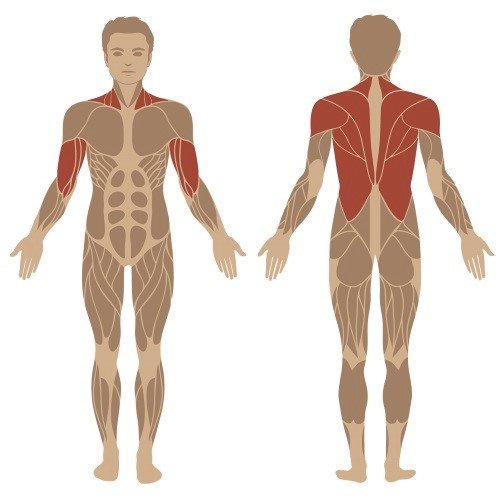
For those who are interested in something more specific; the main muscles used in pull-ups are:
- Latissimus
- Trapezius
- biceps
- Rhomboids
- Lower bone muscle
The latissimus and the trapezius do the lion’s share of the work, whereby the latissimus is much more challenged in the classic variant with the wide overhand grip. In addition, there are a few other muscles that support or stabilize the movement.
Tips for executing your pull-up training
Pull-ups look like a really simple exercise at first. All you have to do is pull your body up. However, it is not that simple. If you want to train your back really effectively with your pull-ups, you should at least consider a few things. After all, you want to hit the target muscles as well as possible and not risk imbalances or injuries.
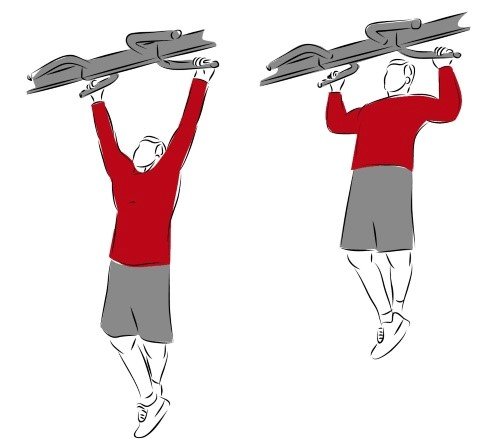
Each pull-up variation is a little different. Here I am mainly describing the variant with a wide grip, in which you can involve your large back muscle the most. The following four tips for doing pull-ups are based heavily on common mistakes that I regularly observe when doing pull-ups.
Pull-up tip 1: grip properly
As mentioned before, there are different pull-up variants. I will introduce you to the most important alternative handle variants later.
This classic pull-up variant is performed with the so-called instep grip or over grip. Your palms are turned away from you. In the variant that I recommend here as a basis for your back training, you reach a little wider than shoulder width. A good rule of thumb for the correct reach is this: If you stretch out your arms and then bend your forearms 90 degrees, you have good orientation.
Tip 2 for doing a chin-up: Full range of motion
Unfortunately, in gyms (if at all) I rarely see pull-ups that are performed over the full range of motion. This is because pull-ups (like many other exercises) are mostly done with as much weight and repetitions as possible. As with all exercises, the same rule applies here: With poor execution, you may be able to manage a few more repetitions, but the training effect is not the same.
On the way down you go to the notice. This really activates all muscles and you can no longer work with momentum. Pull yourself up so far that your head is above the bar or the height of your hands.
Pull-up tip 3: Not so fast my friend
Often pull-ups are performed far too quickly and with momentum. As mentioned before, good, controlled execution will get you a lot further. Too fast and unclean execution is neither very healthy for your musculoskeletal system, nor good for the stimulus you want to give your muscles.
The draining should also be done slowly and in a controlled manner. Try to orient yourself with the speed of movement to classic weight exercises. Take a second or two to tighten and two to deflate, and focus on the muscles you want to train. Do the pull-up movement slowly, in a controlled and focused manner, thereby maximizing the training stimulus.
Tip 4 for doing pull-up training: calm legs
How exactly you should hold your legs when doing pull-ups, opinions differ. What is certain, however, is that you should keep it calm and never use it to gain momentum. The legs are not involved in the movement. Maintain body tension and keep your legs still. If you fake with the help of your legs, you massively reduce the effectiveness of your pull-up training.
In my opinion, you should keep your legs as neutral as possible. So you don’t even get tempted. Cross your feet and just let your legs hang down. If your bar is quite low, you can bend your legs, but you should keep them in this position.
Bonus tip: Trust is good, control is better
After these four, in my opinion the most important tips for doing pull-ups, there is now a bonus tip that is more general in nature. This helps you to learn a good execution faster with all exercises, to internalize them and to stick to them in the long term. This applies to the complex basic exercises such as pull-ups, deadlifts , squats , bench and shoulder presses , barbell rows and lunges most notably. This is where mistakes are most often made, which can lead to suboptimal training success and injuries.
And here it comes: Don’t rely on your technique to be good, even if you follow the rules and have practiced them a bit. Your own perception sometimes deviates a little from reality. Therefore, make videos of your execution and have someone from the outside pay attention to it. This gives you an important additional perspective on your progress.
This is a useful thing not only for learning exercises. You should do this even if you have been training for some time and have already mastered good technique. I notice in myself again and again how mistakes and impurities creep in over time. The earlier you recognize small imperfections, the faster you can take countermeasures and prevent your training from developing in a suboptimal direction.
If you follow these rules, you will enjoy the benefits of pull-ups in your workout for a long time and without any problems. You may have noticed that these rules (with the exception of the first) also apply to the execution of all the alternatives listed in the section but one. If not, that doesn’t matter and you might be happy that you will quickly learn the variants.
How you can improve yourself with pull-up training
If you want to improve your pull-up training, you either want to do more repetitions or more weight. First, let’s look at what you can do with the more common goal, more reps.
How you can finally do more pull-ups
My best tip for gradually doing more pull-ups is to just do more pull-ups every week. Now you might be thinking “what a stupid tip”, but let me explain the principle to you. You won’t always be able to do more (clean) pull-ups in a row from week to week. In some weeks you will succeed, but not in other weeks. If you don’t succeed, just take a short break at the end and then do another repetition. As your total volume increases, the number of repetitions you can do in a row will gradually increase.
What you can also do is do a few more “passive” repetitions at the end of each sentence. Here you relieve the muscles at the end of the work set by taking the concentric (positively overcome) movement part out of the game as soon as you can no longer muster the strength. You can do this, for example, by jumping. You do the eccentric (lowering) movement part very slowly and in a controlled manner.
Only with these two tips did I manage to go from 10 pull-ups to over 50 pull-ups in a row in 2018. For the sake of fairness one should probably say that during this time I also did some exercises for the Tough Mudder and trained to hold on for a long time.
Not everyone can do the desired repetitions with their own weight at all. Many people fail to do a single pull-up once they start exercising. That’s perfectly fine. The pull-up is an exercise that you can learn and then use for your training. However, this approach is not ideal for this. You can find out more about this in my article (soon to be published) with the best tips on how to learn pull-ups.
Pull-up training with more weight
If you can already do more repetitions than you should and your goal is to do pull-ups with more weight, it will be more difficult at first. However, if you want to train in a certain area, for example because you want to build muscle mass , then you should use a certain rep range ( hypertrophy for muscle building training) train and exhaust your muscles. Once you get to the point where you can do more reps, you will want to make your pull-ups harder. This is the only way you will make further progress. You could first make your pull-ups more difficult, for example by using targeted intensity techniques . However, at some point you will need weights.
You can use a weight vest or a dip belt and put extra weight around you. What you prefer is a matter of taste.
I think a vest feels a bit more “natural” when doing pull-ups because it distributes the weight well over the torso. A good weight vest * can be adjusted in small pieces by inserting individual weights. A big disadvantage, however, is that the weights in the vest cannot really be used for other things.
A dip belt has the decisive advantage that you can use the weights that you otherwise use for your training. The dip belt of my choice * has a textile holder for the weights. That makes it more versatile and doesn’t damage the mounting rings on my good bumper plates. One problem is that training with such a belt provokes a sub-optimal posture. Also, for most of them it feels very strange at first to have this extra weight load on their hips.
Pull-up training variants
As already teased earlier, there are some variations on the classic pull-ups. While the classic pull-up for the broad back is performed with a wide instep or overhand grip, the grip position and width of the different pull-up variants are varied. This results in other training stimuli with different focuses. I would like to briefly introduce you to some useful variants in this section. Then you can choose the best for your pull-up training.
If you are also looking for variants to its counterpart, the push-ups, I also wrote my own article about push-up variants as part of a challenge.
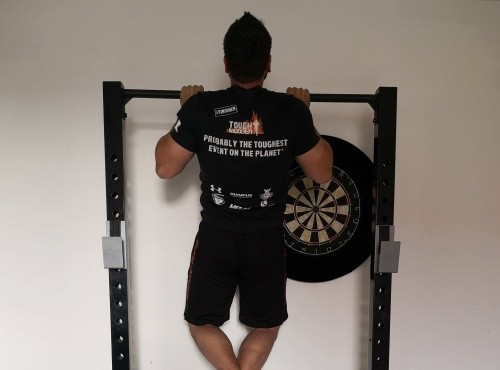
Shoulder-width chin-up in the overhand grip
This type of pull-up is a little easier for most people to do and works the same muscles with a slightly different weighting. The back shoulders and the middle and lower trapezoid muscles are a little stronger and the lats are a little less activated. If you just barely manage to do enough or just barely enough repetitions with the wide variant, try this variant.
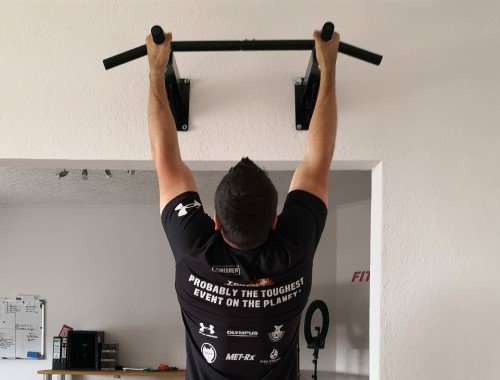
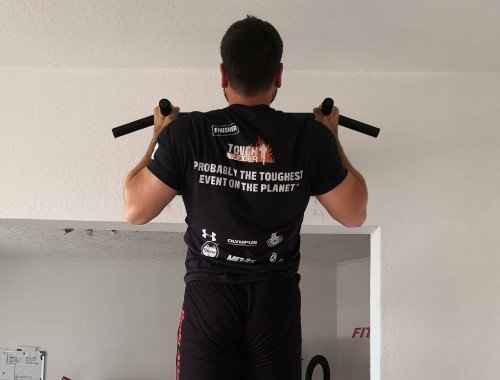
Shoulder-width pull-up in a neutral grip
If your pull-up bar allows you a neutral grip, you should try it out. Many find this variant much more comfortable for the wrists. With this variant, the focus is even more on the lower trapezoid muscles. In my home gym, I like to combine the classic, wide pull-up with such pull-ups in a neutral grip. In this way, in combination with the barbell row, I manage to exhaust my back muscles very well.
Bicep pull-up under grip (chin-up)
The tight pull-up in the underhand grip is also called the chin-up. This variant is the easiest for most. I can currently manage about twice as many of these as of the classic, wide variant in the upper handle. With the chin-up, the biceps are able to support the exercise much better thanks to the changed levers. However, the activation of the latissimus is not that great. Are you looking for an effective weightless biceps exercise? Here you have it!

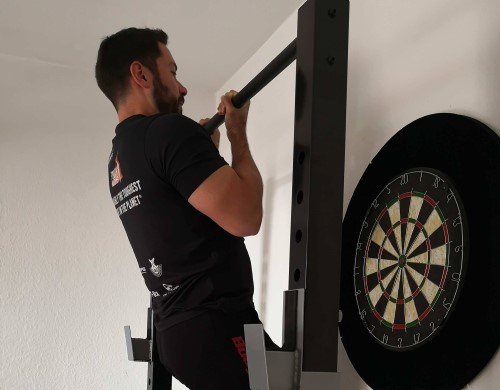
The variant tight in the reverse comb grip involves the biceps much more strongly. It can be a good addition to your training.
Lat pulldowns as an alternative to pull-up training
Now I have praised the whole article so far for the pull-up training and I stand behind this exercise as one of the top exercises ever. Nevertheless, I write the pull-down lathe as an alternative in many training plans. That’s because pull-downs make the progression easier to control. Regular increases are planned in a good muscle building training plan. With a simple, objectively controllable exercise, such as pull-downs, these are easier to comply with.
In addition, the necessary amount of (clean) pull-ups has to be done first. For beginners in particular, it is not always easy (without help) to do eight pull-ups in a row. It’s no shame if you have yet to learn pull-ups. Until then, however, you can effectively use the lat pulldown if you have one available where you are training.
Of course there are a few other variations that you could do. However, I think these are the most sensible ones and most of the other variants are somewhere in between. With these pull-up variants you can also train your back with a very good load mix. Have fun trying it out!
Which pull-up bar for your pull-up training?
One thing that you need if you want to be able to do really effective pull-ups is a good pull-up bar. Of course, you don’t have to worry about that when you train in a gym, sports club or workout park. There you have the bars available that are there. If you want to do your pull-up workout at home, you should get yourself a pull-up bar sooner or later. In this section I want to introduce you to a few different variants, with their advantages and disadvantages.
Actually enough pull-up variants can be performed with every pull-up bar that you can do a good back and biceps workout. Even so, different bars each have advantages and disadvantages. Depending on what your training goals, your spatial requirements, your budget and your other training equipment look like, another pull-up bar is probably the right one for you. Here I want to help you to find this for you.
Pull-up bar for the door
The first category that I would like to introduce to you is the most common in household use: the pull-up bar for the door (also called the door bar). Their popularity is understandable; After all, nothing has to be set up with these poles, nothing gets damaged, you practically do not need any space and they are also quite cheap to get.
I have had several such bars myself. They are inexpensive and therefore particularly suitable for beginners to do a few pull-ups at home on a regular basis. If you choose such a bar, however, you should keep a few things in mind. Otherwise you may regret your decision.
There are essentially two types of pull-up bars for you door. Some are clamped in the door frame and optionally screwed, while the others are hung in the frame.
I cannot recommend a rod that you clamp into the door frame by turning it open. I once had a pole like this and haven’t had any good experiences. This variant just isn’t safe if it’s not bolted to the door frame. After my first crash, I always put a couple of pillows under it. In addition, you have to consider that your door can be damaged by the assembly, even if you don’t screw it down.
My favorite is therefore the other variant. This is hung in the door frame. There are also space-saving versions of them that you can easily stow away in your closet with little space. My favorite is the Powerbar 2 * pull-up bar. It is very stable and adjustable so that it fits in most doors. It can be folded flat after use and stowed away compactly.
Until we mounted a pole on our wall, I used it regularly for several years. The bar has been in the basement since then, but I would still recommend it to anyone looking for a door pull-up bar.
Pull-up bar for wall or ceiling mounting
In my apartment there is now a pole mounted on the wall in the living room. If you have the opportunity and the space to screw something like this onto the wall in a free place, I think this is the better alternative to the rods for the door. Here you simply have a few additional options.
Well assembled, these devices can do a little more than the pull-up bars for the door. This means you can also use a sling trainer, for example, very well or attach a couple of resistance bands to it. Another advantage over a door bar is the possible installation height. Mounted high enough, you can do your pull-ups with your legs stretched out. This means that a few more exercises are possible.
Our pull-up bar on the wall also offers more grip options than the door bar I recommended before.
Make sure that you attach all screws and dowels properly. If the anchorage has even a bit of play, there is a risk that it will tear out over time. In fact, this happened to us on one side because the dowels weren’t designed to withstand enough load and we hadn’t installed the rod completely clean. So we had to rebuild and use even larger screws and dowels.
Multifunction pull-up stand
The next variant of a bar for your pull-up training, which I would like to introduce to you, needs a little more space. Such a pull-up tower or pull-up stand stands free in the room, where it needs some space, but no door has to be blocked or mounted. So this variant also has some advantages if you have the space. One of them is for sure that everyone knows immediately that someone in your household is taking their training seriously. 😉
A friend of mine has this chin-up tower from Sportstech and is very happy with it. The device is really very robust and solidly made, as far as I can tell. It is very practical that the device can be flexibly adjusted and also used for various other exercises.
Power Tower chin-up stand at Amazon *
If you mainly training with your own body weight or doing your strength training with weights with just a few dumbbells (by the way, I recommend a pair of adjustable *) and / or a couple of kettlebells, this is a great training tool.
But if you also want to get a barbell, I would think about buying a rack instead.
Pull-up bar as part of a rack
If you want to build a really good home gym, where you can also do the classic basic exercises with the barbell, you will also think about buying a rack. This provides you with a good basis for doing exercises such as squats , shoulder presses and, with a good bench, bench presses . Such a rack is usually equipped with a pull-up bar (if only because of its stability).
When choosing your rack, you have the choice between two alternatives. If you want something more compact and cheaper, you can use a so-called squat rack (also called a half rack). If you have enough space and value even more stability and security (especially for maximum strength training ), you should opt for a so-called full or power rack. The latter are the “cages” as you can find them in many professional fitness studios.
When I bought my rack, I chose the cheaper and space-saving variant. Luckily for me, while looking for a massive squat rack, I was able to buy an inexpensive exhibit from a no-name manufacturer. A special pull-up bar was not my priority because I already had a good bar mounted on the wall. Above all, it was important to me to have a solid construction with high load capacity and sufficiently long spotter arms. The latter safeguard me when I train alone (as is usually the case). I will write more about my home gym equipment in future articles.
Unfortunately, my squat rack is no longer available or I would not recommend it in general, as it has a few weaknesses. In fact, during my research I found a high quality squat rack on Amazon * that meets my requirements and that I would even prefer to mine today. This also has a versatile pull-up bar.
If I had the choice again (and a little more space), I would probably opt for a so-called full or power rack. In principle, this can be expanded into a complete fitness studio with various add-ons. In this category, Amazon has the 810XLT Super Max Power Cage *, a massive and very affordable set with a versatile pull-up bar and an adjustable weight bench.
Pull-ups without a pull-up bar
In fact, I’ve been asked several times whether you can do pull-up training without a pull-up bar. Of course, you don’t necessarily need your own special bar to do pull-ups.
If you go outside and look around you will find some things that you can (more or less) use. You can also do your pull-up training on a branch or any stable bar outside. Most of the larger cities now also have so-called calisthenics parks, in which special outdoor equipment is set up for bodyweight training. I also found a website where you can search for such parks in your area. There you can find, for example, all the calisthenics parks in my home base in Hanover.
Another alternative that I would like to address are so-called door pull-ups. I have these in my hotel room training plan . You can do it on any sufficiently stable door. For regular training they are certainly not perfect, but much better than no pull-ups at all.
For an optimal pull-up training, however, I recommend that you always train under the same conditions as possible. At least it makes sense to train on the same bar as often as possible. It doesn’t have to be your own, but if you want to do the rest of your training at home, it certainly makes sense to get such a bar for your home gym.
Your conclusion on pull-up training
I hope that with this article I was able to answer the most important questions about your pull-up training. You should now know what is essentially important when performing and (with a little practice) be able to use pull-ups effectively for your training. I hope that this can help you with your training design and implementation. If you can’t do a pull-up yet, an article will soon appear here on the blog with tips on how you can learn pull-ups effectively.
Of course there are a lot of other bodyweight exercises that you can use effectively for your training. My friend and blogger colleague Pat Bauer has specialized in exactly this and developed a training program completely without weights. This consists of a book, over 85 exercise instructions with videos and several training plans. With the code ” fitvolution ” my readers get a 15% discount: Zum P.A.T. Bodyweight training program *
If your goal is to build muscle, I recommend my book Muscle Building Basics . In it you will find out the most important things that you really need to know and consider for your muscle building. My program is a real 80/20 approach that really helps you to build muscle mass reliably with manageable effort. It is the first real “no bullshit” guide for effective muscle building and I am very proud of it.

